Blog 
Click here to go back
Billing Customers for Time and Materials Jobs
QuickBooks has the ability to track expense and time transactions recorded by the user and holding those so they can be used on an invoice for a customer.
This can be as simple as postage purchased for a client who will be invoiced for the cost. It can also be as complicated as a major time and materials job requiring details spanning a twenty-five-page invoice.
In either case, those amounts do not need to be kept on any list outside QuickBooks to remember to invoice the customer, QuickBooks becomes that list.

The check in the above screenshot will be available for invoice creation in QuickBooks without additional manual entry.
Note the two arrows. A Customer:Job name has been selected in the appropriate column of the stub portion of the check. Even if jobs are not used in your business, the customer name needs to be entered here in order to use this invoicing feature.
Entering the customer name allows the Billable column to be selected. Placing a checkmark here directs QuickBooks to keep track of this expense. It will be used later to create an invoice for this customer.
The line drawn around the two tabs of the check stub highlights an important method for entering these types of expenses. Note that the Items tab has been used, not the Expenses tab.
The Expense tab requires an account from the Chart of Accounts to be used to identify the expense. The Items tab requires an item.
The benefit to using an item rather than expense is superior reporting. While the item may be created to post to the very same account that might be used on the Expense tab, using the item will improve reports in QuickBooks that use these types of transactions.
Now it is time to invoice the customer for the blueprint changes and see how our job is made easier by using the above method for creating the check.

What you see when creating an invoice for this customer depends upon how the above preference is set. Should QuickBooks give you a list of available time/costs to add? Should it do nothing? Should it popup a message asking the user what should be displayed.
![]()
This screenshot shows the popup message that will ask if the user wishes to add billable costs to this invoice. Even if Exclude is selected, or the preference is set for this popup not to appear (“Don’t add any”), the option is still available. The Add Time/Costs icon on the invoice ribbon will allow using that list to create the invoice.

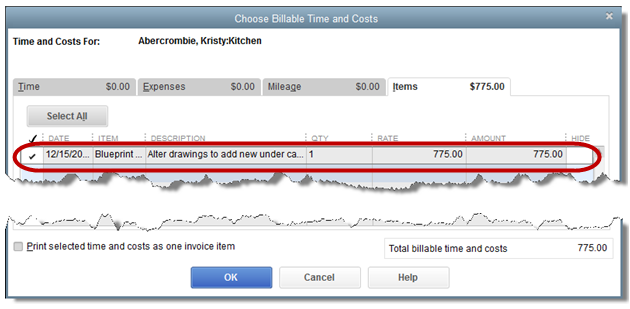
However you access it, this is the Choose Billable Time and Costs window. Note that the check we created using an item is listed here on the Items tab. Other tabs exist for time, expenses, and mileage.
The memo used in the on-screen check stub is shown here as the default description for the invoice. It can be overridden. Since there is no price entered on this particular service item (Blueprint Changes), the cost is suggested. A different price could be entered on the invoice.

The invoice has been created without any alterations from the check we used to pay the expense. It only took seconds.


